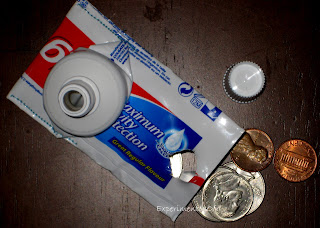
Also Colgate has this Oral Care Brigade where you collect and send back oral care items and they upcycle or recycle them. This sounds like something a college dorm could do successfully and you can actually BUY upcycled creations from this and other waste streams through DwellSmart.
Here goes. I only had one smallish tube to use so I didn't want to mess it up:
Materials:
Cleaned and dried Toothpaste tube with screw cap (I used a 6 inch but I recommend a bigger one!). You can cut off the bottom edge to clean it but don't cut up the sides.
scissors
hole punch (optional)
sewing machine
hot glue
Procedure:
Cut off the very end seal of the tube if you haven't done so already (can be done at any time)
Flatten the spout down against the tube.
With the spout closest to your body, turn the tube over and fold the spout back onto the body of the tube with about a 1/2 inch margin.
Grab the end of the tube and fold it down over the spout
Ballpark where the tube hits the spout. We need to cut a hole through the tube so that the spout can be used as the closure. Using a hole punch (if you have one large enough) or scissors, cut that hole. I actually used the hole punch and then used scissor to make the hole slightly larger. You can now slip the tube end onto the spout. It should be snug.
Pull the end of the tube off of the spout to finish. Using a straight stitch (I just used the thread in my machine, nothing fancy) sew down the spout to the tube. You can also use a dab of hot glue under the spout to flatten it against the tube (I didn't do this but I think it's a good idea).
Now your purse is ready to roll. Put in some change, fold over, and cap to close.
With such a small tube, I could only fit a small number of coins in it. Probably better with paper money. Also it probably isn't great for every-day use. One because you will lose the cap (unless you attach it somehow) and Two the hole is pretty snug over the spout and I fear that with repeated use it could wear down and rip. I know it's aluminum and all but it can still get damaged. I just don't think it's a very functional piece. Maybe if i used a bigger tube to start with I could "hem" the raw edges and put the hole farther from the cut edge it would be better. Also it is sort of pointy and sharp.
What do you think? Any creative ideas to make this better?
This post is part of the Upcycled Crafting Challenge (#freefromtrash) hosted by Calley, The Eco Chic, and is part of a one month challenge to create from trash. This challenge will hopefully open your eyes to the number of items that we still end up trashing every day that could be used by ourselves or our kids to create fun and useful items. To find out more about the challenge and to see other projects click on over to Calley’s announcement post.
This craft was shared with:


Oh my heck, look at how crafty you are! I'm so impressed. That's awesome! I never would've thought of that. I am officially your newest follower and I am so excited to be too! Yay for being blog friends! :)
ReplyDeleteWhat a cute idea! I love it. Thanks for linking up on Saturday Show and Tell. I hope you'll be back again this week with some more of you great ideas.
ReplyDelete-Mackenzie
http://www.cheeriosandlattes.com
lebron 17
ReplyDeletegolden goose sneakers
louboutin
supreme clothing
kobe 11
lebron 16
supreme clothing
air jordan
adidas gazelle
curry 4
xiaofang20191215