A journal

Thanks for visiting me at Experiment MOM (Mother of Multiples). My digital Scrap for Hire business, ScraPicts, is coming soon so please check back with me again or Click the Follow Me button on lefthand side of my blog.

Showing posts with label #freefromtrash. Show all posts

Tuesday, July 31, 2012

FINAL Upcycled Challenge: WILD CARD - random upcycled things #freefromtrash

Well, it has been a fun month of crafting and blogging.  I hope you have enjoyed some of my crafts!!  Thank you so much to Calley at EcoChic for hosting the Challenge and Kate at Zmombie and the other moms who participated in many of the challenges for motivating me to continue.  It isn't easy crafting with kids sometimes!!  Some of my favorites were the k-cupsicles, baby food jar lid checkers, the hummingbird feeder and the pet food bag camera wallet.  Please check them out if you didn't get to previously!!


So here are a couple of random upcycled things that didn't fit into any of the challenge categories:


Old coat rack to Tomato Plant Stand


Plastic Flower cup to Hummingbird Birdbath

Did you know that conventional bird baths are too deep for hummingbirds? Generally they use shallow pools or even dripping or misting water to bathe in as well as clean their beaks of sticky nectar.  When we got these cups at a street fair over the 4th of July, I immediately thought they would make cute bird baths for such little birds.  I don't know if they will use it but here is how I constructed it.  Basically I used several brown pipe cleaners to make a perch around the top perimeter of the cup and hot glued it in place. Then I used another brown pipe cleaner circle and attached two long loops of fishing line.  The cup fits into the pipe cleaner circle (I didn't glue it because I want to be able to remove and wash the cup frequently) and then I just tied the two loops of fishing line together at the to make the hanger.  I added a couple of river rocks to weigh the cup down a bit and then filled with water.  Hummies have checked it out but haven't used it yet.  


Thursday, July 26, 2012

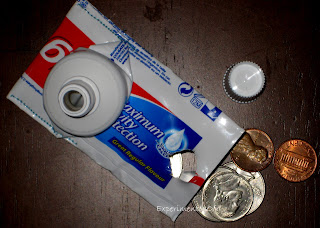
Upcycled Challenge: Toothpaste tube to coin purse #freefromtrash

If you have googled "upcycled toothpaste tube" or "toothpaste tube craft" you might be a tad disappointed with the results.  I have only seen a handful of ideas floating about cyberspace such as make a toothbrush holder, refill it with homemade toothpaste, refill it with icing for cake decorating, pen holder, and protective case for knives.  Really??  Well there were a COUPLE of really neat ideas.  One was this chandelier by Ingo Maurer and the other idea that I thought was stellar was a toothpaste tube coin purse by Grazia Bosco.  This person is apparently Italian so pretty much anything you'd want to read about this craft is in Italian.  There don't appear to be any tutorials on how to make this adorable purse (excuse me please if I am wrong!) so I thought I'd make my own.  Now, there is one tute on Terracycle but it doesn't utilize the tube spout and cap as the closure mechanism which is the whole WOW factor of using the tube in the first place.

Also Colgate has this Oral Care Brigade where you collect and send back oral care items and they upcycle or recycle them.  This sounds like something a college dorm could do successfully and you can actually BUY upcycled creations from this and other waste streams through DwellSmart.

Here goes. I only had one smallish tube to use so I didn't want to mess it up:

Materials:
Cleaned and dried Toothpaste tube with screw cap (I used a 6 inch but I recommend a bigger one!).  You can cut off the bottom edge to clean it but don't cut up the sides.
scissors
hole punch (optional)
sewing machine
hot glue

Procedure:
Cut off the very end seal of the tube if you haven't done so already (can be done at any time)
Flatten the spout down against the tube.
With the spout closest to your body, turn the tube over and fold the spout back onto the body of the tube with about a 1/2 inch margin.

Grab the end of the tube and fold it down over the spout
Ballpark where the tube hits the spout.  We need to cut a hole through the tube so that the spout can be used as the closure. Using a hole punch (if you have one large enough) or scissors, cut that hole.  I actually used the hole punch and then used scissor to make the hole slightly larger.  You can now slip the tube end onto the spout. It should be snug.


Pull the end of the tube off of the spout to finish.  Using a straight stitch (I just used the thread in my machine, nothing fancy) sew down the spout to the tube. You can also use a dab of hot glue under the spout to flatten it against the tube (I didn't do this but I think it's a good idea).
Now your purse is ready to roll.  Put in some change, fold over, and cap to close.


With such a small tube, I could only fit a small number of coins in it.  Probably better with paper money. Also it probably isn't great for every-day use.  One because you will lose the cap (unless you attach it somehow) and Two the hole is pretty snug over the spout and I fear that with repeated use it could wear down and rip. I know it's aluminum and all but it can still get damaged.  I just don't think it's a very functional piece.  Maybe if i used a bigger tube to start with I could "hem" the raw edges and put the hole farther from the cut edge it would be better.  Also it is sort of pointy and sharp.

What do you think?  Any creative ideas to make this better?

This post is part of the Upcycled Crafting Challenge (#freefromtrash) hosted by Calley, The Eco Chic, and is part of a one month challenge to create from trash.  This challenge will hopefully open your eyes to the number of items that we still end up trashing every day that could be used by ourselves or our kids to create fun and useful items.  To find out more about the challenge and to see other projects click on over to Calley’s announcement post. 
This craft was shared with:

Rhinestone Beagle ;

Tuesday, July 24, 2012

Upcycled Challenge: Pet Food Bag to Camera Wallet #freefromtrash

We just recently switched the dogs to this new grain-free food called Arcana due to skin allergies.  The dogs really like it and it comes in this really pretty turquoise bag, which I thought would be perfect for this upcycling challenge.  I've already used the pretty patterned part for several projects including decorating some baby formula cans for my crafting area.


I've also seen on etsy some crafters who make reusable totes from pet food bags, like this shop Prancing Pony, and this shop Cluck Cluck Craft.  


I decided to make a case for our new Kodak Playsport video Camera.  This bag is a very heavy duty foil, the kind that you can't rip and that helps the food the bag holds retain moisture. To prepare the bag, cut it into sections and wash it because it smells like dog food!  Dry it well.  For this project I used an 8.5inch x 4inch rectangle and a 5inch X 4inch rectangle. I also had some left-over felted wool from my wool soaker project so I decided to line the inside of the pouch with it.  


Back (turquoise) and front (lettered)

attach felt to insides
I used a zig-zag stitch to attached the wool to the inside sides of the foil.  I did a horrible job keeping everything straight.  Be careful because if you have to rip out a seam the foil retains the needle holes, unlike material where they usually can be closed up.  Also I tried to leave a margin around the wool for attaching the front and back sections but i did a horrible job at that too.  The wool is very stretchy and the foil material is very slippery - a disastrous combo for keeping things looking neat.  Now if I had been thinking I would have attached some sew-on velcro to the front and back sections BEFORE I sewed them together.  You could also use stick on velcro dots but I don't have any handy right now. 

foil is slippery and gets all curly


Because you can't easily turn this type of material ( i tried!), you will have to top-stitch to fasten the front and back together.  The playsport fits in snugly which is nice and the felt protects the screen.  I like to allow the cord to hang out because then you can use it as a wristlette for carrying your camera, but you could always stick it in to the pouch.  Unfortunately this isn't waterproof (maybe "water-resistant") because of the stitching, but it would probably protect the camera in a light rain.  I need to make another one with more attention to detail.  What do you think?

Kodak PlaySport fits snugly

I should have sewn on velcro before I put the sections together!

back detail
I just made this up as I went along but if you are looking for a compilation of wallet or camera case patterns, check out these sites.


http://tipnut.com/wallet-patterns/


http://tipnut.com/camera-cases/


This post is part of the Upcycled Crafting Challenge (#freefromtrash) hosted by Calley, The Eco Chic, and is part of a one month challenge to create from trash.  This challenge will hopefully open your eyes to the number of items that we still end up trashing every day that could be used by ourselves or our kids to create fun and useful items.  To find out more about the challenge and to see other projects click on over to Calley’s announcement post. 


This craft was shared with:


Creative Itch


Making the World Cuter


The Well Crafted Home


Whip It Up Wednesday

Upcycled Challenge: Junk Mail to Notepad #freefromtrash

It's likely that even if you have converted all your bills to paperless and opted out of paper statements etc you still get a ton of junk mail.  I kept noticing how much white space there is in most junk mail (backs of letters, the envelopes etc) so I thought it would be neat to make a note pad.  Luckily I also received this cute card stock calendar from one of the cloth diaper shops I bought from recently so I thought this would make a cute and functional cover for the notepad.  Start by collecting your junk mail and scoping out all the white space.  Depending on how big you want your notes (I opted for a small square like a post-it note size) make a small template and cut out the white space of your junk mail.  Then just stack and place inside your cover (if you are using one) and staple together.  When they are exhausted, just take out the staples and refill!  Great idea to keep in the glove box of your car, in your pocketbook or around the house.  You never know when you'll need to jot something down!!


This post is part of the Upcycled Crafting Challenge (#freefromtrash) hosted by Calley, The Eco Chic, and is part of a one month challenge to create from trash.  This challenge will hopefully open your eyes to the number of items that we still end up trashing every day that could be used by ourselves or our kids to create fun and useful items.  To find out more about the challenge and to see other projects click on over to Calley’s announcement post. 

Upcycled Challenge: Cardboard to template #freefromtrash

Here's an easy one.  Use the cardboard from a cereal box or the like to create a template to make envelopes.  This is the template for a 5x7 envelope from an 8.5x11inch sheet of paper, but you can size it up or down.  Just be sure to use the USPS guidelines for the correct size of a first class letter, found here.


This post is part of the Upcycled Crafting Challenge (#freefromtrash) hosted by Calley, The Eco Chic, and is part of a one month challenge to create from trash.  This challenge will hopefully open your eyes to the number of items that we still end up trashing every day that could be used by ourselves or our kids to create fun and useful items.  To find out more about the challenge and to see other projects click on over to Calley’s announcement post. 

Upcycled Challenge: Wool Sweater to Wool Diaper Soaker #freefromtrash

I have wanted to try this for a LONG time.  I have been cloth diapering the kids now since they were home from the hospital, so that makes it just about 11 months!  About a month ago, I finally drank the kool-aid on wool soakers.  Up until that point, I really didn't know how they worked or really what the point was.  And they can be expensive!  So basically a wool soaker is a wool diaper cover.  100% wool can absorb up to 30% of its weight before it feels wet but the caveat is that it doesn't retain moisture very well.  There can be compression leaking which is caused by, well, compression.  That is part of the reason people generally use wool for overnight diapering because kids aren't moving around much.  I use wool diaper covers over a fitted with a regular waterproof cover.  I was having issues with the regular covers shifting around and leaving the fitted exposed, causing wicking.  With a wool cover over the fitted/cover combo we have 12 hours of stay-dry babies!!  I have 5 of the Grateful Buns wool covers, which are super well-made and actually have several layers of wool to add to the absorbancy.  For my first attempt, I just made a single-layer XXL cover.

Having no throw-away 100% wool sweaters in the house at all, I needed to first take a little expedition to the Salvation Army.  The kids decided to throw a fit in the store so I was only able to wade through about half an aisle's worth of sweaters, but here in Southern CA, there really isn't a whole lot in the way of 100% natural fibers.  I found two sweaters, a black one from The Limited and Turquoise one from Anne Klein Knit Wear that were 70% lambswool, 20% Angora rabbit hair and 10% Nylon and it was about 14$ for both sweaters. Both were super soft but definitely needed to be felted to meld the larger stitches together.  When I got home, I tosssed them in the washer on hot with regular detergent and a cold rinse then hot dried them and then repeated the process to shrink and felt them.  It worked really well.  Then I found a soaker pattern by Katrina at Katrina's Sew Quick Soaker Blog.  The pattern for the XL-XXL can be found here and the instructions for assembly can be found here.  I followed the instructions except the sweaters I had weren't long enough to cut the main body of the soaker in one big piece so I had to piece together two pieces (front and back separate and then stitched together at the crotch area) to make the body.  I also used the waist band of the turquoise sweater to make the leg cuffs, which is actually pieced onto the body before sewing up the sides of the main body of the soaker.  I didn't take pictures at all the steps because you can find plenty of tutorials out there (like this one from scrimplythrifty) or you can make it up as you go if you are an experienced seamstress.

SO this is what I started with:
And here is the almost-finished product:

Now I just need to lanolinize it and it will be good to go.  Adding lanolin back to the fibers adds to its urine neutralizing powers.  I use liquid lanolin by NOW that is scented with lavender essential oils.  I think it turned out really cute and I can't wait to try it on the kids!

This post is part of the Upcycled Crafting Challenge (#freefromtrash) hosted by Calley, The Eco Chic, and is part of a one month challenge to create from trash.  This challenge will hopefully open your eyes to the number of items that we still end up trashing every day that could be used by ourselves or our kids to create fun and useful items.  To find out more about the challenge and to see other projects click on over to Calley’s announcement post. 


Monday, July 23, 2012

Upcycled Challenge: Denim to bean bags #freefromtrash

For years, many a saturday afternoon was spent with good friends playing one of our favorite competitive games, Baggo.  Since we've moved to CA, my husband and I have been jonsin' for some real Baggo action and we decided that we need to build our own boards.  If you are unfamiliar with Baggo (aka Cornhole aka Bean bags), you can check out the The American Cornhole Organization
The Governing Body For Sport of Cornhole for information on game play.

While my husband is in the process of construction a set of Baggo boards, I thought I would make a set of bean bags.  I've made them before from duck cloth (heavy duty canvas) but since we are doing an upcycling challenge I thought I would use this scrap of old jeans that i've had hanging around forever.  Denim is usually pretty heavy duty so this will be a perfect fabric for bean bags as they get some serious abuse being tossed and slamming against plywood boards.  Here is my easy 4- bag tutorial.

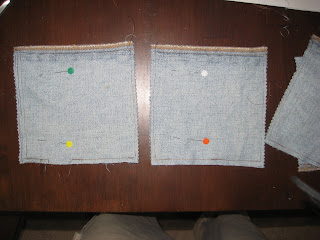
1. Cut one leg off of a pair of old jeans
2. Using a 6.5 inch square template or a ruler, mark off 4X adjacent 6.5 inch sections using the seam on one edge as your "straight edge."  Using an already sewed seam reduced your sewing workload!!
3. Sew the squares with about a 0.5 inch seam allowance on each side of your drawn line.  These don't have to be perfectly square! They are just beans bags!  On one edge, leave about a 2 inch opening for turning and filling purposes.  Make sure to reinforce the stitching (I usually run over it back and forth a few times with my stitch) on each side of the hole for good measure.  I like to leave the hole in the middle of a straight section rather than at a corner because it makes stitching the hole closed a lot easier.
4. Cut the squares apart on the drawn lines (I used pinking shears but you don't have to)
5. Turn each bag, fill with feed corn or pop corn (use the super cheapo stuff that you can get in large bags...) and closed the hole (hand or machine stitch).

Official regulations are that cornhole bags are 6 inches square and weigh 15-16oz.  I usually just fill up the bags to my desired fullness and close.  You could even use iron-ons or paint to decorate your bags!  HAve fun!! 


This post is part of the Upcycled Crafting Challenge (#freefromtrash) hosted by Calley, The Eco Chic, and is part of a one month challenge to create from trash.  This challenge will hopefully open your eyes to the number of items that we still end up trashing every day that could be used by ourselves or our kids to create fun and useful items.  To find out more about the challenge and to see other projects click on over to Calley’s announcement post. 

linkwithin

Related Posts Plugin for WordPress, Blogger...