Well it's getting to be that time of year. Do you get a CSA basket of fresh veggies each week? Do you often have more than you can use before it goes bad? I was recently gifted a gob of basil and I needed to find some ideas of things to do with it before it tanked. Oh, and I am not really a pesto person. Here's what I did!
Sautee zuchinni with basil and garlic and olive oil
Make a Basil Simple Syrup
Make basil extract
Make a basil-infused olive Oil.
The first is pretty self-explanatory. It was tasty, especially cold. It would be a great side salad for a summer picnic.
Basil simple syrup is pretty easy. Chop up a half cup basil. Add 1/2 cup sugar and 1 cup water to a small pan and add basil. Bring to a simmer over medium heat just until the sugar dissolves and then take off heat. Let cool and strain into an airtight container. Store in the fridge. There are some great suggestions on what to do with basil simple syrup here at Oh My Veggies. I am having it in Strawberry lemonade as I type!
Basil Extract is also pretty easy. I chopped up a cup of basil and added it to a glass jar that has a tight fitting lid (I used an old salsa jar). Add 3/4 cup vodka (you can also use grain alcohol). Cover jar with plastic wrap and screw on the cap. Shake to mix and store in a cool dark place for 4-6 weeks, shaking every couple of days. After this time period, strain out the herb and you will have basil extract. More information can be found here at Mountain Rose herbs.
Basil-infused Olive oil is pretty straightforward. I hope to use this to make a basil salt scrub next week. Add 1/2 cup ripped or chopped basil to about 1 cup olive oil in a small pan. Warm the oil over medium heat but don't let it boil. Transfer to a glass jar and cover. Store in a cool dark place for a week and then strain out the herbs if desired. You can also find a similar recipe using garlic in addition to the basil here at Boston Food and Whine.
Showing posts with label recipes. Show all posts
Showing posts with label recipes. Show all posts
Sunday, April 21, 2013
Sunday, March 31, 2013
Chocolate-dipped Strawberry Carrots for Easter
Hoppy Easter everyone! Last night my friend Sarah came over for strawberry dipping. She had seen these adorable orange chocolate-dipped strawberries on the cover of the Harry and David catalog and so we set out to recreate them. Also Sarah HAD given up sugar for lent but let's just say the fast was over a tad early!!!

So this is what we did. Some notes ahead of time.
1. Get medium strawberries and if you are picking them yourself, make sure to keep the leaves and even some stem on them to grasp while dipping.
2. Wash and dry thoroughly before dipping. Bring to room temp if they have been refrigerated.
3. Set out cookie sheets with parchment for drying dipped strawberries
4. We got about 24 strawberries out of a double recipe of chocolate plus a bunch of peanut butter filled pretzels
5. Making the little carrot lines seemed difficult. Read on..
Ok here is the recipe we used for making the double recipe of chocolate: 2lb white chocolate morsels+ 2tablespoons shortening. Place in double boiler over med heat to melt and stir. Add food coloring to desired color. Don't bother using toothpicks to hold strawberries. They will just pull right out. Grasp strawberry by the stem and dip to cover. We found the chocolate in the double boiler cooled pretty quickly so some of our berries were a tad lumpy (but still delicious!) and you have to stir the chocolate and dip quickly. Place on parchment to dry.


We contemplated making the carrot lines but decided against it. We felt like if the chocolate were melty enough to drizzle from a pastry bag or snipped ziplock that it would be too hot to handle and if it were cool enough to handle it wouldn't be drizzly enough. Maybe we could have used a fork to splatter the chocolate on but it certainly wouldn't be very controlled.
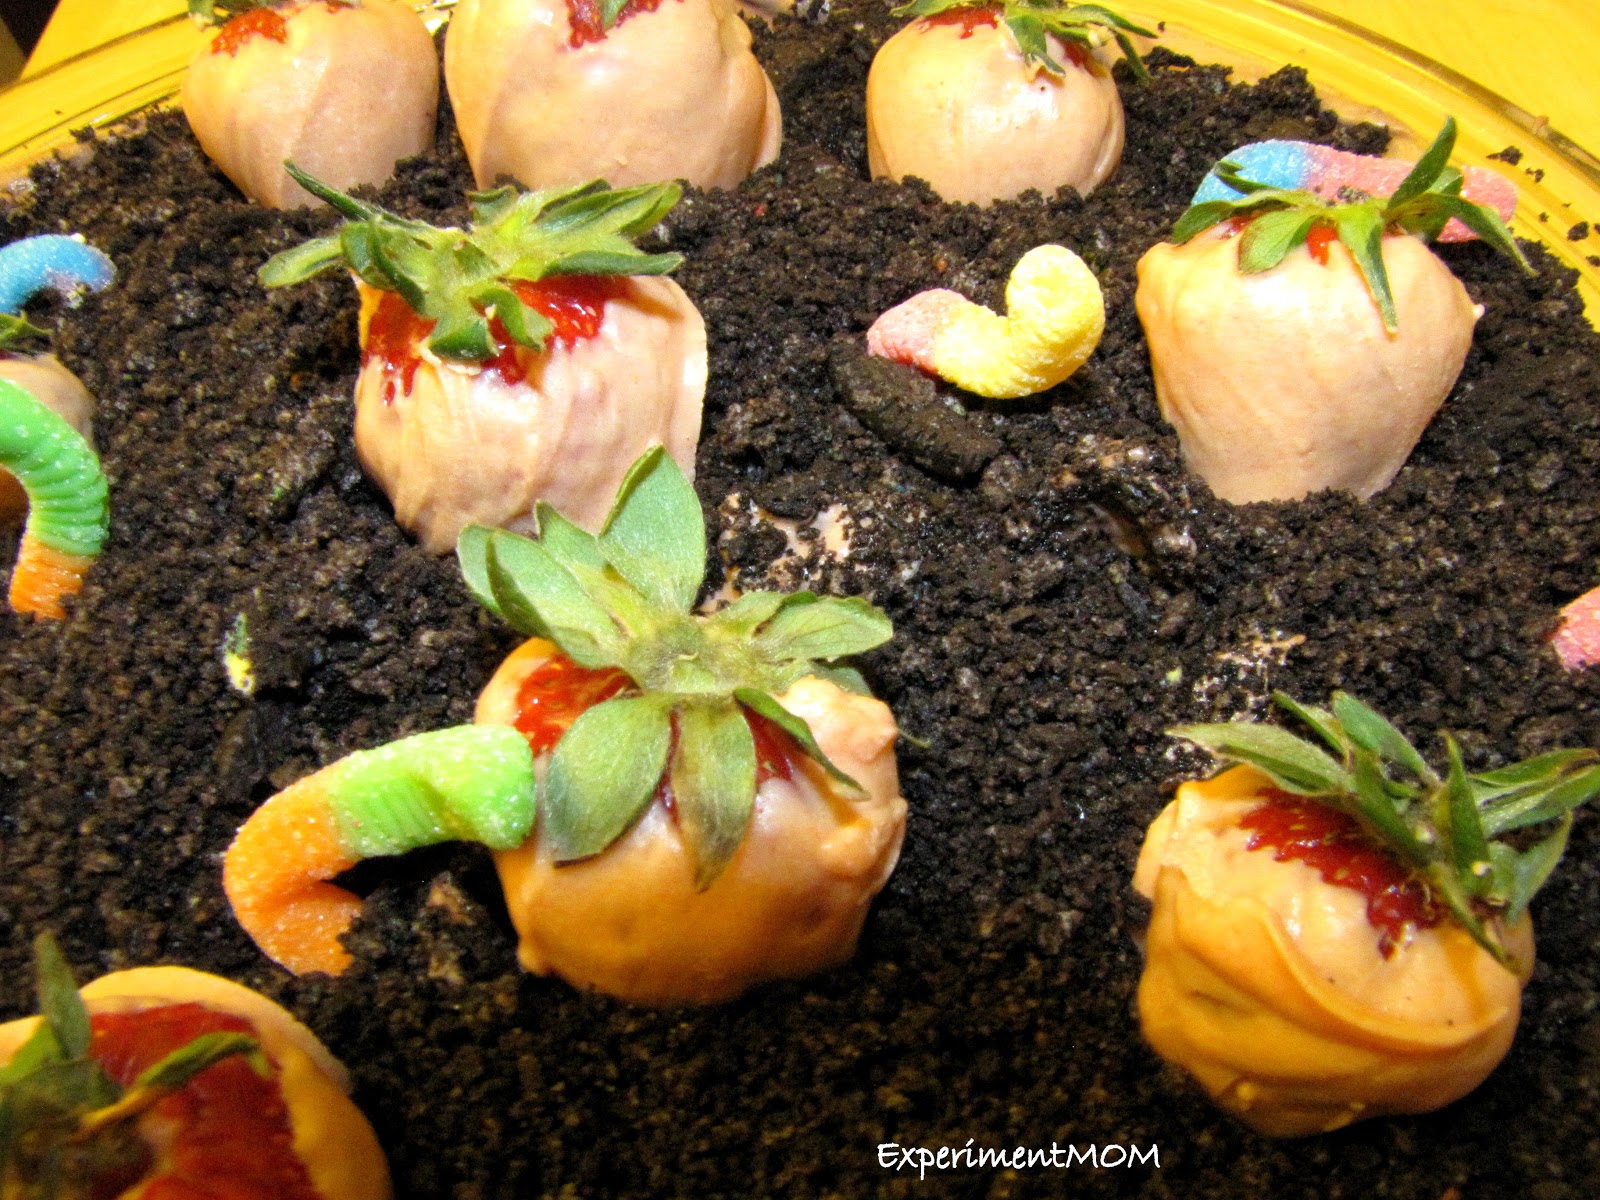
Since we are heading to a friend's house for Easter, I decided to make a Carrot Garden Dirt Pie. I used this recipe for the "dirt." I've forgotten where i read this recipe originally but there are recipes all over the internet that are pretty similar.
14oz-16oz oreos
8oz cream cheese
1/2 butter softened
1 cup powdered sugar
1/2tsp vanilla
5.9 oz pkg instant pudding chocolate (or vanilla)
3 cups milk
1 pkg cool whip
1. Use food processor to chop oreos (cream and all) into small pieces.
2. Cream together cream cheese, butter, sugar and vanilla.
3. In large bowl add milk to pudding and mix together. Fold in cool whip.
4. Add butter mixture to Pudding mixture and mix well.
Alternate layers of cookies and pudding in a large glass pan. Top with layer of cookie dirt. I used a deep dish casserole dish and it just barely fit everything!
To decorate, I used a wine stopper to depress cone-shaped depressions in the "dirt" to set the "carrots" into. added some gummy worms for fun! Enjoy!!


Harry and David Version:

1. Get medium strawberries and if you are picking them yourself, make sure to keep the leaves and even some stem on them to grasp while dipping.
2. Wash and dry thoroughly before dipping. Bring to room temp if they have been refrigerated.
3. Set out cookie sheets with parchment for drying dipped strawberries
4. We got about 24 strawberries out of a double recipe of chocolate plus a bunch of peanut butter filled pretzels
5. Making the little carrot lines seemed difficult. Read on..
Ok here is the recipe we used for making the double recipe of chocolate: 2lb white chocolate morsels+ 2tablespoons shortening. Place in double boiler over med heat to melt and stir. Add food coloring to desired color. Don't bother using toothpicks to hold strawberries. They will just pull right out. Grasp strawberry by the stem and dip to cover. We found the chocolate in the double boiler cooled pretty quickly so some of our berries were a tad lumpy (but still delicious!) and you have to stir the chocolate and dip quickly. Place on parchment to dry.


We contemplated making the carrot lines but decided against it. We felt like if the chocolate were melty enough to drizzle from a pastry bag or snipped ziplock that it would be too hot to handle and if it were cool enough to handle it wouldn't be drizzly enough. Maybe we could have used a fork to splatter the chocolate on but it certainly wouldn't be very controlled.
Since we are heading to a friend's house for Easter, I decided to make a Carrot Garden Dirt Pie. I used this recipe for the "dirt." I've forgotten where i read this recipe originally but there are recipes all over the internet that are pretty similar.
14oz-16oz oreos
8oz cream cheese
1/2 butter softened
1 cup powdered sugar
1/2tsp vanilla
5.9 oz pkg instant pudding chocolate (or vanilla)
3 cups milk
1 pkg cool whip
1. Use food processor to chop oreos (cream and all) into small pieces.
2. Cream together cream cheese, butter, sugar and vanilla.
3. In large bowl add milk to pudding and mix together. Fold in cool whip.
4. Add butter mixture to Pudding mixture and mix well.
Alternate layers of cookies and pudding in a large glass pan. Top with layer of cookie dirt. I used a deep dish casserole dish and it just barely fit everything!
To decorate, I used a wine stopper to depress cone-shaped depressions in the "dirt" to set the "carrots" into. added some gummy worms for fun! Enjoy!!


Saturday, March 23, 2013
Easter fun - Turmeric and Lemon frosted Cupcakes
What? a non-scrapbooking post? LOL. Yep this week i'd like to get back to some lifestyle stuff- crafts and such. Last night I had to make a bunch of cupcakes for our annual Spring Fling which is an egg hunt, crafts and activities for our mothers of multiples club. I knew I wanted to make an easy bunny rabbit but wasn't sure about the frosting. I am on a natural food coloring kick right now so I thought I would see how turmeric colored and flavored some cool whip I had. It was a beautiful yellow shade and the flavor needed - something! well I had a lemon hanging around and I thought that maybe those two flavors might melt together pretty well. So I squeezed (squoze?) it and added just the tiniest little amount of lemon juice to the whip. It did very slightly curdle the whip which gives it a fun texture, and it tasted - well - pretty good. So if you want to replicate it, try adding the turmeric slowly to some cool whip or other whipped cream frosting, and mix well and taste as you go. Then add lemon juice a very small amount at a time until you get the taste to your liking. Ok I haven't seen Turmeric Lemon Frosting anywhere else on the internet so if you come across something, i'd love to see it.
Here is a picture of three bunny cupcakes I made - the one on the left is just cool whip. The middle is cool whip with just lemon juice and the right cupcake has the turmeric lemon frosting. I used the pastel candy corn as ears and yogurt covered raisins (in easter colors) for the mouths (unfortunately neither of these have natural dyes - only fake dye...ugh).

And of course we saw the Easter Bunny with just about expected reactions. I hope they are not scarred for life.

Saturday, March 9, 2013
A post about a sandwich
OMG. I just made the BEST egg salad sandwich. As we gear up for Easter and all the egg-related fun projects I have planned in my head, I happened to have a bunch of hard boiled eggs at the ready for consumption. And while the feeding-hard-boiled-eggs-to-toddlers "eggsperiment" backfired (literally - wow- that was HEINOUS. I am not going to elaborate as this is a food post), the adults are today enjoying some fab-u-lous Egg salad. Here it is:
3 hard boiled eggs
2 tablespoons (or more) mayo
1 tbsp (or more) yellow mustard
2 small sweet yellow peppers, coursely chopped
1/4 cup french onions.
ground pepper to taste
OMG - I know - french onions? you are saying. Ick. But I had them leftover from some recipe that entailed breading chicken with them and thought I would throw them in. Best Idea Ever. Seriously - try it.

Thursday, February 28, 2013
I love lemon (tarts!) and this week's layouts


 |
| Tart shell before filling |
 |
| before baking - notice it looks separated but it still came out smooth after baking |
 |
| the finished yumminess |
And here are some layouts I finished this week. The first is of my husband's Tough Mudder that he did in early February. He is with his teammates Keith and Brian. It was a cold and raw day but he survived with only a few bruises and some VERY dirty socks and shoes to show for it. Oh and a particpant T-shirt. SCORE! Picts courtesy of MarathonFoto and elements by Lia Scrap Only for Boys Kit and Kelsey Inspired
Studios Alpha from An Innocent Heart Collection
 |
| Lia Scrap (Only for Boys) and Kelsey Inspired Studios Alpha from An Innocent Heart Collection |
The next is a picture of my cousin dressed up as an FBI agent for Halloween. I thought it would be fun to blow up the badge and hollow out the center to make it a frame. Elements by Trixie Scraps and Melissa Bennett Designs Cops and Robbers Collab (retired) and photo courtesy of E. Foxen

And the third is an Easter-y layout of my cousin. I used some new elements from The Urban Fairy including the Just Love, Flutter Fields, Love Me Painted Easter and photo courtesy of E. Foxen.

Thursday, December 13, 2012
Reindeer Gingerbread Cookies


In preparation for a cookie exchange I decided to try my hand at making some gingerbread cookies. I always see those peanut butter cookies with the hershey's kiss stuck in them and I thought that doing that with gingerbread cookies would make a nice festive holiday cookie. I found this recipe on the McCormick website and thought I would give it a try. I found that refrigerating the dough is a must and that 1-1.5 inch dough balls make a nice size cookie as these do not spread very much. It is also a pain in the butt to unwrap 60 kisses so have your little helpers lend a hand (with a few extra kisses to be lost to little helpers' tummies, no doubt). With a couple of successful batches under my baking belt, I decided to up the ante and try my hand at reindeer gingerbread cookies (and you know you've seen these all over pinterest!)
Makes 5 dozen or 30 (2 cookie) servings.
Prep Time: 20 minutes
Refrigerate Time: 4 hours
Cook Time: 8 to 10 minutes per batch
3 cups flour
2 teaspoons McCormick® Ginger, Ground
1 teaspoon McCormick® Cinnamon, Ground
1 teaspoon baking soda
1/4 teaspoon McCormick® Nutmeg, Ground
1/4 teaspoon salt
3/4 cup (1 1/2 sticks) butter, softened
3/4 cup firmly packed brown sugar
1/2 cup molasses
1 egg
1 teaspoon McCormick® Pure Vanilla Extract
1/4 cup granulated sugar
60 kiss-shaped candies
1. Mix flour, ginger, cinnamon, baking soda, nutmeg and salt in large bowl. Set aside. Beat butter and brown sugar in large bowl with electric mixer on medium speed until light and fluffy. Add molasses, egg and vanilla; mix well. Gradually beat in flour mixture on low speed until well mixed. Press dough into a thick flat disk. Wrap in plastic wrap. Refrigerate 4 hours or overnight.
2. Preheat oven to 350°F. Shape dough into 1-inch balls. Roll in granulated sugar to coat. Place 2 inches apart on ungreased baking sheets.
2. Preheat oven to 350°F. Shape dough into 1-inch balls. Roll in granulated sugar to coat. Place 2 inches apart on ungreased baking sheets.
For reindeer decorations, have on hand red (for Rudolph) and/or brown (Dasher, Dancer, Prancer and Vixen, Comet and Cupid and Donder and Blitzen..you know, the normals) peanut M and M's, chocolate chips and pretzels for antlers. You MUST insert the reindeer face decorations while the cookies are hot otherwise they will not adhere to the cookie. I had a dickens of a time getting the pretzels to stick in and thus half my cookies are antler-less. I guess they are female reindeer?? The ones that did stick in are pretty fragile and will be a pain to transport intact. (After a quick google seach, it turns out that both male and female reindeer grow antlers and that most male reindeer actually shed their antlers by December. Only non-pregnant females usually retain their antlers until about April. Interesting)

Thursday, October 25, 2012
Finger food for the toddlers
So since the kids have started walking, they have transformed into little finger-food eating machines. They are barely letting me feed them by spoon anymore and if I try to, they each have to have their own spoon and I can only fill it with food and then THEY have to feed THEMSELVES. This can be quite a mess so I default to finger foods for most of their meals. I have been trying to get them to eat raw veggies like broccoli but most of the healthy stuff ends up on the floor (where even the dogs won't eat it..lol)
So I found these recipes for easy healthy finger-foods that I thought I would share with you.
The first is a Bisquick based mini-"quiche." I think it's more of a fritatta but regardless this is SUPER easy and a nice recipe because you can easily customize it to your nutritional needs. It is also nice because the cheese is just added on top and not in the batter so you can keep the fat down. I got this recipe from Scattered Thoughts of a Crafty Mom (hey that sounds like me! lol)
I just made a batch and I use my mini pan and my regular muffin pan for more adult-sized portions (that I eat for lunch along-side the kids...). Here, I added a head of broccoli finely chopped and just sprinkled the tops with shredded cheddar. These also store nicely in the fridge and or freezer for a couple day's worth of meals.

The second is a recipe for oatmeal breakfast bars. I just bought a huge box of those single serving sized intand oatmeal packets and about a third of the box is the apple cinnamon flavor which I don't really care for. And since I'd like the kids to eat more grains in finger-food form, I thought I'd try out a breakfast bar recipe from Food.com.
2 cups rolled oats, uncooked
1 cup oat flour (can be made by pulverising rolled oats in a blender or food processor)
1 cup packed currants or 1 cup raisins or 1 cup chopped prunes or 1 cup other dried fruit
1 cup apple juice or 1 cup orange juice (you could also use 1/4 cup molasses and 3/4 cup water)
1/4 cup white sugar or 1/4 cup brown sugar
1/2 teaspoon cinnamon
1/2 teaspoon salt
1/2 cup vegetable oil
1/4 cup sesame seeds or 1/4 cup nuts, pieces
Directions:
1. Preheat oven to 375 degrees F.
2. Grease a 9 inch by 13 inch pan, or two 8 inch by 8 inch pans.
3. Combine all ingredients in bowl and mix well.
4. It should be moist enough to form a ball, without extra liquid.
5. Put mixture in prepared pans and spread evenly.
6. Bake for 30 minutes.
7.Remove from oven and cut into squares while still hot.

So I found these recipes for easy healthy finger-foods that I thought I would share with you.
The first is a Bisquick based mini-"quiche." I think it's more of a fritatta but regardless this is SUPER easy and a nice recipe because you can easily customize it to your nutritional needs. It is also nice because the cheese is just added on top and not in the batter so you can keep the fat down. I got this recipe from Scattered Thoughts of a Crafty Mom (hey that sounds like me! lol)
Ingredients:
- 3 eggs
- 1 1/2 cups milk
- 1 1/2 cups bisquick
- 1/4 tsp salt
- dash of pepper
- 1/4 cup melted butter
- Heat oven to 375°F. Generously grease mini muffin cups with shortening or cooking spray.
- In small bowl, stir all ingredients except filling options until blended. Spoon dough/egg mixture into the muffin cups.
- Sprinkle your filling options over the top of the muffins, finishing with cheese.
- Bake about 20 minutes or until edges are golden brown and centers are set.
I just made a batch and I use my mini pan and my regular muffin pan for more adult-sized portions (that I eat for lunch along-side the kids...). Here, I added a head of broccoli finely chopped and just sprinkled the tops with shredded cheddar. These also store nicely in the fridge and or freezer for a couple day's worth of meals.
 |
| fill almost the whole cup with egg mix |
 |
| then add your fillings |
 |
| ready to go in the oven |

 |
| baked goodness |
The second is a recipe for oatmeal breakfast bars. I just bought a huge box of those single serving sized intand oatmeal packets and about a third of the box is the apple cinnamon flavor which I don't really care for. And since I'd like the kids to eat more grains in finger-food form, I thought I'd try out a breakfast bar recipe from Food.com.
2 cups rolled oats, uncooked
1 cup oat flour (can be made by pulverising rolled oats in a blender or food processor)
1 cup packed currants or 1 cup raisins or 1 cup chopped prunes or 1 cup other dried fruit
1 cup apple juice or 1 cup orange juice (you could also use 1/4 cup molasses and 3/4 cup water)
1/4 cup white sugar or 1/4 cup brown sugar
1/2 teaspoon cinnamon
1/2 teaspoon salt
1/2 cup vegetable oil
1/4 cup sesame seeds or 1/4 cup nuts, pieces
Directions:
1. Preheat oven to 375 degrees F.
2. Grease a 9 inch by 13 inch pan, or two 8 inch by 8 inch pans.
3. Combine all ingredients in bowl and mix well.
4. It should be moist enough to form a ball, without extra liquid.
5. Put mixture in prepared pans and spread evenly.
6. Bake for 30 minutes.
7.Remove from oven and cut into squares while still hot.
So I substituted 6 packets (2 cups) of the apple cinnamon instant oatmeal, 1 cup raisins, 1/4cup brown rice syrup and 3/4 cup water and 1/4 cup sunflower seeds. For some reason it didn't quite make enough to spread into a 9x13 pan so I just spread it out as far as it would go. Next time i'll either double it or make it in a square pan. The baked up nicely and they taste pretty good. A tad bland for me but it will be good for the babies. I hope they like it!

So what do you think? Do you have any one-bowl easy and healthy finger food go-to recipes??
Saturday, July 14, 2012
The "S'more-eo"

OMG. Just had a chocolate craving and realized that I actually have a bag of chocolate chips in the pantry. Since it seemed a tad desperate to eat handfuls of chocolate chips I saw the marshmallows and was bummed I didn't have any graham crackers to make a s'more. Then I spied the hubby's oreos. PERFECT.
1. Open oreo.
2. Place cookie side on plate and place marshmallow on said cookie.
3. Microwave 15 sec.
4. On cream side place 5-6 chocolate chips and smoosh into cream.
5. Replace cream/chocolate side on marshmallow and ENJOY


Sunday, July 8, 2012
Cap'n Crunch "Rice Krispie" Treats
I don't eat sugary cereal. I was raised on cheerios and oat bran. But sometimes you just need a little bit of fun in your life. So while I was thinking of dessert ideas for the boys' upcoming 1st birthday party, I ran across Trix rice krispie treats on Pinterest. I thought they looked interesting and they reminded me of the dot pattern in the front of the Very Hungry Caterpillar Book...something like this...
 |
| photo courtesy of Cravings of a Lunatic |
 |
| Eric Carle's Dots |
I was intrigued. I thought maybe I could make the treats and then use a butterfly cookie cutter to make them into butterfly treats. I decided I needed a test run of the recipe (of course i do!) and for some reason the name TRIX escaped me when I ran to the store but I DID find Cap'n Crunch ALL Berries. I decided they fit the bill - round, colored, sugary. They'll do. I also modified the recipe found at Cravings of a Lunatic as follows for an 8x8 pan of very thick treats.


1 bag (450ish grams) marshmallows
5 cups Cap'n Crunch All berries cereal
1/4 cup butter
Put butter and marshmallows in a bowl. Microwave 1 minute and stir. Microwave another minute and stir to make sure all butter is melted. Add in 5 cups cereal and mix to coat well. Spray an 8x8 pan generously with pan spray and also spray the back of a spatula or spoon. Dump cereal into pan and flatten with spatula. Refrigerate until solidified.
Here is the finished product. It was pretty tasty, I'll have to admit, and very sweet. ALMOST too sweet. And a lot of the marshmallow ended up at the bottom, probably because the mixture was a bit too warm when I put it in the pan. These are obviously too thick for cookie cutter-ing so the next batch will be in a 9x13 pan. I am also feeling like they are missing some yellow so might have to throw in some Kicks or use the Trix or mix everything together!! What do you think??

Permission was granted to use individual photos from other websites.
Thanks to Kim at Cravings of a Lunatic!!
All other photos are property of www.experimentmom.blogspot.com. Please contact me at jenniferlgardner1@gmail.com for permission to use.
Subscribe to:
Posts (Atom)