1. Open GIMP
2. File - New Image - Size 12inx12in or whatever size you want.
3. File - Open as Layers – find file with your PSD template file on your computer. Click open. All the layers of the template will load.
4. Now add a picture. File - Open as Layers - browse for the picture on your computer and click Open
5. Now, Using the Move tool (4 arrows) move the picture over the photo box where you want the picture to be (here shown in multi colors, sometimes they are grey or black). If you need to resize the image you can do that now with the Scale tool or if you want to just crop it, you can just plunk it over the photo box.
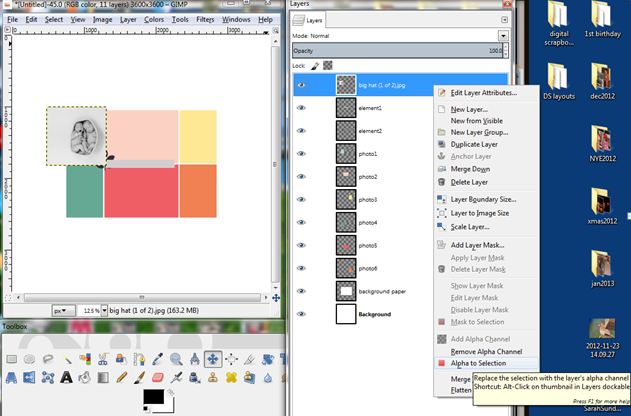
6. Here come the tricky parts. Make sure the layer with your image is grey (ie selected). Right click on the layer and way down at the bottom you will see Alpha to Selection. Click that.
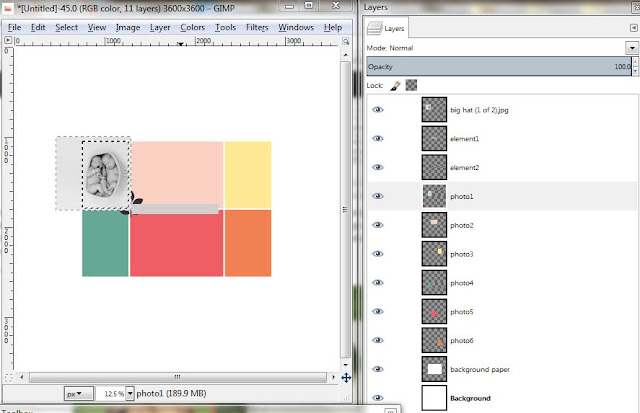
7. Now click on the layer that has the photobox that you want your picture to be in. For my example it is the light aqua box. Click on Select by Color and then click in the picture where that aqua box is (under the photo). Click Select then Invert. Here you will see both the picture and the box (underneath) will have the "marching ants" around them.
8. Click on your photo layer and click the Delete key. This should crop your picture in the size of the box underneath.
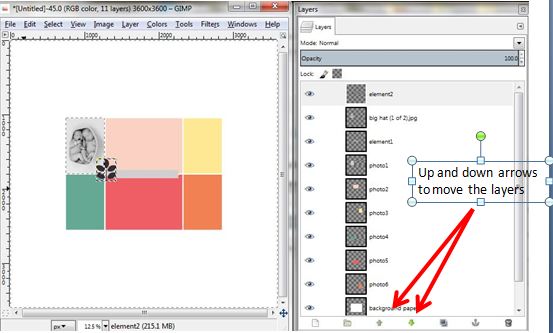
9. Now you can move your picture layer so that is floats under any embellishments on the template. You can do this in the Layers dialog box using the up and down arrows at the very bottom.
I hope this works for you. Please let me know!!
Oh and here are some newer LO's I have put together:
Credits for CAKE:
Papers: Gina Cabrera (Hello Cupcake, Confetti, Yellow Dots,
Tangerine), Julie White (Snow Friends)
Word Art: Gina Cabrera (Oh Happy Day)
Alpha: MadGeniusDesigns (An Innocent Heart )
Embellishments: Juliana Kneipp (You are my Sunshine),
Krystal Hartley (Just a number), Jen Dipzinski, Gina Cabrera (Oh Happy Day)
Credits for Daddy Loves You:
Papers: Traci Reed (FlyAwayWith me), SugarPlum Paperie (Grateful
Hearts), Snickerdoodle (5000FBLikes)
Embellishments: Birdee’s Nest, Agnes Biro, Manue Designs,
Odd, Peeps and Milo, Erika Zane, Charlize Creations, Che Yang, Mandy King,
Alpha: Zoe Pearn (So Sweet)
Credits for Take Me Out to the Ballgame:
Heather Roselli Designs Runs Batted In Collection, Erika
Zane Grow, Sara Schmutz Indian Summer


Note to self. I think this technique only works if all your boxes are different colors. That is why you are selecting "Select by Color." So my work-around is that if my template has only black boxes, go and fill them all with different colors.
ReplyDeleteAnd for Step 7, is very important to do it in exactly that order otherwise this technique will not work!
ReplyDeleteAnother note - if you do this and you get a white border around your picture, go back, start again (yeah undo button!) and before you do anything click on your picture layer and Click Layer - Transparency - Add Alpha Channel. Then follow the steps. It should crop the picture to the size of the box without a white border around it.
ReplyDeleteultra boost 3.0
ReplyDeletenike air force 1 high
nike react
jordan retro
hermes birkin
red bottom shoes
jordan shoes
nike shoes
ferragamo sale
yeezy shoes
xiaofang20191215
kyrie 5
ReplyDeletevapormax
paul george shoes
curry 7
yeezy shoes
adidas flux
balenciaga
moncler
kd 12 shoes
balenciaga sneakers
buy replica bags a03 j9s78i8b87 best replica designer bags l74 t4k93b6b73 Louis Vuitton replica Bags s18 k1w09g6y52
ReplyDelete