A journal

Thanks for visiting me at Experiment MOM (Mother of Multiples). My digital Scrap for Hire business, ScraPicts, is coming soon so please check back with me again or Click the Follow Me button on lefthand side of my blog.

Showing posts with label garden. Show all posts

Sunday, March 10, 2013

Eggsceptional Craftiness - Egg planters

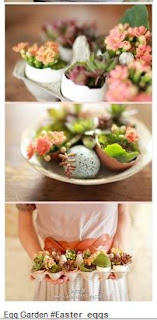
If you read my last post you know that I have been boiling hardboiled eggs for various food and craft purposes.  Well the inspiration for the egg craftiness was this Pinterest post about making little planters from egg shells.  OMG, how cute are these??  I really tried to get the original pin on this one, but I went back like 10 degrees of separation and I still hadn't located the original.


So I broke out the pan and boiled me up some eggs just for this purpose!  
Then I got to the task of hollowing out the eggs. In retrospect I could have blown out the raw eggs using the pinhole method.  But here is what I did to the boiled eggs:
boiled egg, sharp knife, small spoon
insert sharp tip carefully and cut the top off the egg
Hollow out.  If you are lucky the egg will just pop out. If not, you'll have to scrape it out

empty egg shells. I let them dry outside for a day or two

Then fill with potting soil and add plants. I have tons of succulents here in SoCal

Oh I poked a small hole in the bottom of each eggshell (with a very sharp corn holder) before filling in order to provide drainage. I also placed them on a bed of potting soil to allow them to drain. I hope these cuttings will grow and then they can be transplanted. I am wondering how long the eggshells will remain intact.  These would also be cute using dyed eggs from easter (using natural dyes of course....I hope to have a crafty post about this in the nearish future!)

What do you think??  Cute, right??

Tuesday, July 10, 2012

Upcycled Challenge: Newspaper to planter pots #freefromtrash

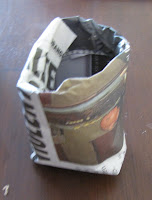
Ok so apparently I am an idiot when it comes to paper crafts.  I have tried twice to make these "fancy" origami newspaper planting pots (just google it for tons of picts and tutorials) and have failed both times.  Now I'll admit that I have a tad of a lack of attention to detail when it comes to crafting.  I have considered naming myself the " Good Enough" Crafter.  The last step of all these tutorials says just pop open your pot and fold down the sides.  Well mine doesn't POP open. I have no idea what I am doing wrong.  So I'll resort to the "good enough" method:

Take a sheet of newspaper.
Cut in half top to bottom.
Fold in half left to right.  This will make the beginnings of two containers.
Roll one strip around a baby food container
Squish up bottom. Remove glass container.
Fill and plant.

I think it came out pretty cute for starting seeds or rooting cuttings. And bonus you can plant it right in the ground.


This post is part of the Upcycled Crafting Challenge (#freefromtrash) hosted by Calley, The Eco Chic, and is part of a one month challenge to create from trash.  This challenge will hopefully open your eyes to the number of items that we still end up trashing every day that could be used by ourselves or our kids to create fun and useful items.  To find out more about the challenge and to see other projects click on over to Calley’s announcement post.

Monday, July 9, 2012

Upcycled Challenge: Straw to Seed Storage #freefromtrash

I have to admit that I don't have a lot of straws hanging around. The kids are only 10 months and haven't mastered the sippy cup, let alone the straw.  I did manage to collect a few this 4th of July (the neat ones with the spoon on the end) which we used to each some delish italian ice, but somehow they disappeared before I could come up with a craft for them.  Luckily a friend that came over today left her plain old clear straw here and as I was looking around the garage I noticed my random packs of heirloom seeds just hanging wide open.  Those paper packs you get seeds in aren't great for re-storage especially if you don't use all the seeds and even more so if they happen to get wet. That is exactly what happened to my Chioggia Beet seed pack and I resorted to storing the seeds in another paper envelope.

Well, how about using the straw as waterproof, resealable seed storage.  This is really easy and I am SURE someone has done this already somewhere on the internet but I swear I didn't even google it.

Materials:
Glue gun (i found it!)
Straw
marker  (fine tipped)

Clean and dry straw.  Cap one side with a blob of hot glue.  Allow to solidify.  Fill with seeds.  Cap open end with blob of hot glue.  Allow to solidify before turning straw on side.  Label straw with seed name. DONE.


So of course this method of storage depends on your seed size.  Beans and Peas won't fit in this kind of straw.  And depending on the size of number of your seeds you may need more than one straw to store all your seeds.  I was also thinking how easy it would be next season to cut off one end, dispense the number of seeds I need and the reseal with a blob of hot glue.  Maybe I'll even get my beet-planting method in good shape for next year.  I only managed to get like 2 beets this year.  So sad.

This post is part of the Upcycled Crafting Challenge (#freefromtrash) hosted by Calley, The Eco Chic, and is part of a one month challenge to create from trash.  This challenge will hopefully open your eyes to the number of items that we still end up trashing every day that could be used by ourselves or our kids to create fun and useful items.  To find out more about the challenge and to see other projects click on over to Calley’s announcement post.


Monday, April 23, 2012

Mommy Gardner, how does your garden grow?

So it has been about a month and a half since I started seeds indoors to plant my vegetable garden.  I ordered all my seeds from the Seed Savers Exchange.  Here they are:
Yep, that's 7 types of tomatoes, cucumbers, watermelon, snap peas, beans, carrots, beets, parsley, and lettuce. I purchased my square foot garden frame from SquareFootGarden.com and read up on the internet about how to plant the squares of the square foot garden.  The day after I put in my seedlings we had torrential downpours in Southern California and little sun so a few of my plants did make it, probably due to root or stem rot.  So I quickly started some new seedlings to fill in the gap and they are doing well now.  Here is how the garden looks about 1 month out.  Peas and beans are doing great.  Beets and carrots look good.  Cukes are behind because I has to restart the seedlings and lettuces are also behind because i had to restart them as well.  Most of the tomato plants look pretty healthy and the watermelons look good though they grow pretty slowly. Parsley is being grown in a pot not shown here.  Can't wait for the summer to harvest all my crops!

linkwithin

Related Posts Plugin for WordPress, Blogger...